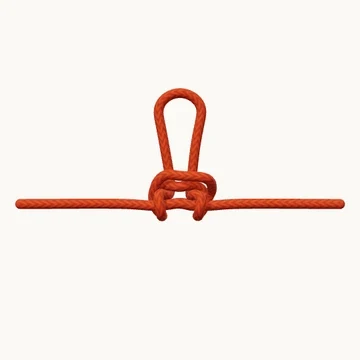
Keep both ends outside the working area. Form the knot in the middle of the rope.
Loops & Ropework · 12 steps
Make a fixed loop in the middle of a rope without using either end.
Also known as Butterfly loop, Lineman’s loop.
The alpine butterfly forms a fixed loop in the middle of a rope while leaving both ends available. Its central crossings lock the loop between two shoulders, making it useful when an attachment is needed away from either rope end.
Do not identify it only by the outline of the loop. Inspect the two shoulders and the route through the middle as the knot is dressed. In the trucker’s-hitch lesson, this loop serves as the opening through which the working end returns to tension the line.
When to use it
Add a midline attachment loop.
Keep in mind
Dress the two shoulders evenly and check the central crossings.
Check your knot
The shoulders are balanced on the two standing parts.
The loop passes through the central arrangement in the shown direction.
No strand cuts across its neighboring shoulder while dressing.
How to tie Alpine Butterfly
Start in the middle
Keep both ends outside the working area. Form the knot in the middle of the rope.
Lift a bight
Lift the middle into an open bight.
Twist once
Twist the bight to form the first opening.
Twist again
Twist in the same direction to make two stacked openings.
Fold the top loop behind
Carry the upper closed fold behind the lower opening.
Go around the lower loop
Pass outside both sides of the lower opening.
Bring the fold below
Carry the closed fold below the standing line.
Return in front of the opening
Bring the fold toward the front of the lower central opening.
Pass through the middle
Draw the closed fold through the original lower opening from front to back.
Extend the loop
Draw the closed bight upward.
Dress the butterfly
Draw the loop upward and the standing parts outward as the collars gather.
Inspect the route
The same rope forms two opposite standing parts and an upper loop.