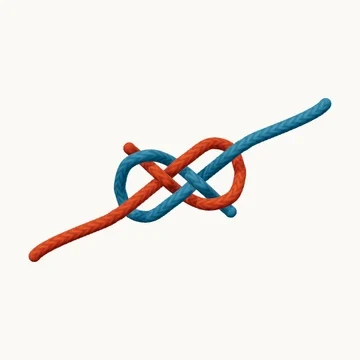
Join two ropes with an interwoven bend whose open form alternates over and under.
The carrick bend is easiest to learn as a flat pattern. Lay a loop in the first rope, then weave the second through the whole arrangement. Its crossings alternate, creating an open, balanced shape that can be checked before the ropes are drawn together.
Under tension the flat pattern changes into a more compact knot. The open teaching form is useful for seeing the route, but it should not be mistaken for a decorative mat that stays flat under every load. Follow the second rope from end to end rather than judging only the outline.
When to use it
- Join larger, flexible ropes.
- Practice a bend with a clearly alternating weave.
Keep in mind
Many incorrect weaves resemble a carrick bend. Dress it deliberately and allow for its change of shape when tensioned.
Check your knot
- The second rope follows the full over-under sequence.
- The tails lie diagonally opposite in the flat arrangement.
- No turn has been replaced by a simple crossover.