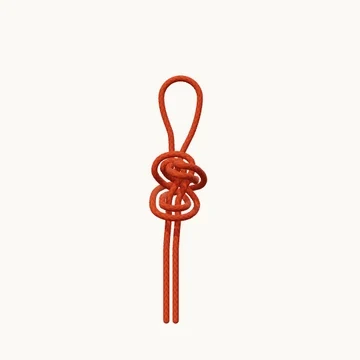
Figure Nine Loop

Figure Nine Loop
Preparing the rope…

Fold the rope

1/8

Work with the closed bight, keeping the free parts together.

Loops & Ropework · 8 steps

Make a doubled-rope eye with an extra half turn beyond a figure eight.

Also known as Figure 9 loop.

A figure-nine loop follows the same broad idea as a figure-eight loop, but the folded end travels an extra half turn around the standing pair before it enters the opening. That extra movement brings the fold to the opposite face for its final passage.

Work with the two strands as a pair throughout. A whole additional revolution would make a different route; watch the fold change sides before feeding it down through the opening. The completed eye stays open while the doubled turns are brought together.

When to use it

  • Learn a bulkier fixed eye tied in a bight.
  • Compare the final entry of figure-eight and figure-nine loops.

Keep in mind

Extra bulk does not make every use safer. Match the knot, rope and finish to the intended system; this model does not certify a climbing attachment.

Check your knot

  • The added movement is a half turn.
  • The closed fold enters from the shown opposite face.
  • Paired strands remain parallel through the dressed body.
How to tie Figure Nine Loop
  1. Fold the rope

    Work with the closed bight, keeping the free parts together.

  2. Make the first loop

    Curve the doubled rope over and bring the fold down on the left.

  3. Cross behind the standing parts

    Carry the fold around the pair of standing parts.

  4. Continue around the front

    Bring the fold back toward the first opening.

  5. Add the extra half turn

    Continue around once more, bringing the fold to the opposite face of the opening.

  6. Pass down through the loop

    Feed the closed fold through from the front toward the back.

  7. Draw out the eye

    Pull both sides of the bight through together and open the finished loop.

  8. Dress the nine

    Bring the outside turns inward and keep each pair of strands side by side. The finished eye remains open.

Explore the 3D steps
References & further reading