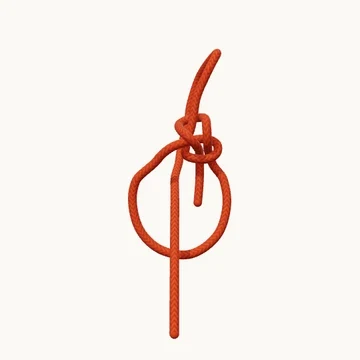
Running Bowline

Running Bowline
Preparing the rope…

Start with a long end

1/9

Leave enough rope to make the running loop and a bowline.

Boating · 9 steps

Tie a bowline around its own standing part to create a running loop.

A running bowline uses an ordinary bowline as a small fixed eye. The standing rope passes through that eye, allowing the larger loop to change size. The bowline itself stays fixed; it is the rope passing through it that moves.

Trace the large loop first when learning the knot. If the standing part has not been enclosed by the bowline eye, the result is just a normal fixed loop. This distinction is useful when placing a loop around an object that should cinch under the intended pull.

When to use it

  • Place a running loop around timber or another object.
  • Practice the difference between a fixed eye and a sliding loop.

Keep in mind

The large loop tightens around its contents. Keep it away from people and animals; an unloaded bowline can also loosen if repeatedly shaken.

Check your knot

  • The bowline eye encloses the standing line.
  • The bowline has its usual collar and tail inside the eye.
  • The larger loop can run through the fixed eye without a snag.
How to tie Running Bowline
  1. Start with a long end

    Leave enough rope to make the running loop and a bowline.

  2. Bring the end around

    Take the working part around the object or space you want the running loop to surround.

  3. Return alongside the line

    The bowline will be tied around the original standing part.

  4. Make the small nipping loop

    Turn the working part into the small bowline opening.

  5. Form the bowline eye

    Lead the end around the standing line. That line must pass through this larger eye.

  6. Thread the small opening

    Bring the end up through the small loop.

  7. Make the collar

    Go behind the bowline’s own standing part.

  8. Return through the opening

    Tuck back through the small loop, leaving the tail inside the bowline eye.

  9. Dress the bowline eye

    Snug the small nipping loop and collar. The long standing line must remain free to run through the fixed eye.

Explore the 3D steps
References & further reading