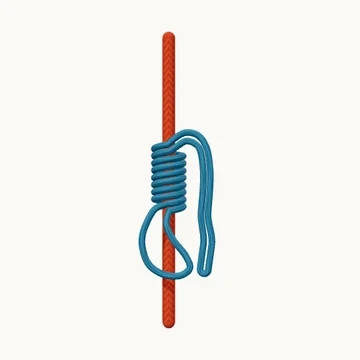
Wrap a closed cord loop around a host rope and bring both end bights together.
Also known as French Prusik.
An autoblock is a friction hitch made from a closed loop of smaller cord. The doubled cord winds around the host rope, then both end bights connect below the wraps. Unlike a Klemheist, the upper bight does not pass through the lower one.
The model shows four doubled wraps and leaves the connector out so both bights are visible. A practical arrangement clips both to the same suitable locking connector. The cord-loop joining knot belongs outside the gripping band, where it cannot disrupt the turns.
When to use it
- Learn the wrap arrangement of an autoblock friction hitch.
- Compare a two-bight attachment with a Klemheist.
Keep in mind
Grip depends on cord, host rope, wrap count and system geometry. Rappel-backup placement and operation require qualified instruction; this close-up omits the rest of that system.
Check your knot
- All wraps run in the same direction.
- Neither bight is threaded through the other.
- Both bights are included in the intended attachment.