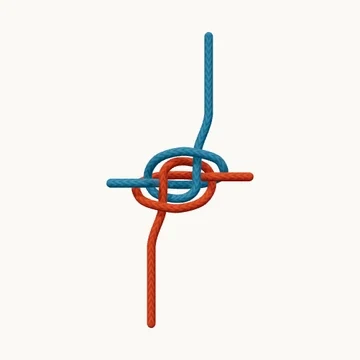
Join two ropes with interlocked overhand loops and opposing central returns.
Also known as Rigger’s bend.
Hunter’s bend uses two overhand structures woven into one another. Start by interlocking the loops, then bring each end through the central crossing in the proper direction. The two colors make the separate routes visible even where the finished body looks symmetrical.
Compare it with the Zeppelin bend rather than treating them as interchangeable. Their loose loops can look alike, but the initial interlock and central returns differ. Follow one rope all the way through, then trace the other before pulling the body together.
When to use it
- Join two rope ends with an interlocking bend.
- Study the difference between similar-looking paired overhand structures.
Keep in mind
Hunter’s bend can jam after loading. Choose a different bend when easy release is a main requirement, and test any rope combination before use.
Check your knot
- The starting loops interlock before the returns.
- Both tails use the central passage shown.
- The opposing standing parts draw the two halves together.