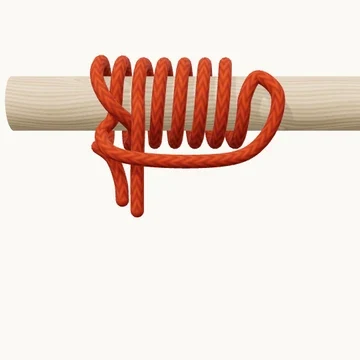
Grip a spar with parallel turns and an end-threaded finish on the pulling side.
The icicle hitch spreads its grip over several turns around a spar. Begin on the intended pulling side and wind away from it. The end returns outside the turn band, passes behind the standing part and goes over the spar to form the finishing arrangement.
This lesson uses five gripping turns and an end-threaded finish. It therefore does not depend on lifting a loop over the end of the spar. Follow the two finishing trips over the bar and keep the lower opening clear for the returning tail.
When to use it
- Study a hitch intended for a pull along a spar.
- Compare a multi-turn grip with a rolling hitch.
Keep in mind
Actual grip varies with the spar surface, taper, rope and pull. Test the intended direction under controlled conditions; the name does not guarantee grip on every smooth object.
Check your knot
- The gripping turns wind away from the pull side.
- The return stays outside the turn band.
- The finish sits on the pulling side with the tail beside the standing part.