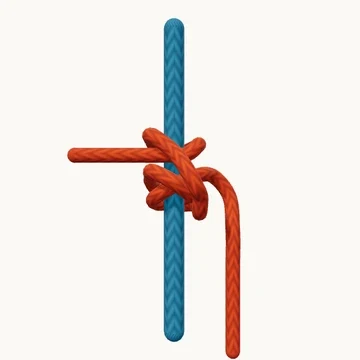
The smaller rope approaches from below on the right. The main rope stays straight.
Boating · 8 steps
Attach a smaller rope to a larger one for a pull along its length.
The rolling hitch attaches a rope to another rope for a pull along its length. The gripping turns sit on the side that must resist movement, while the finishing half hitch secures the end. The direction of pull is part of the knot’s operation, not just a convenient way to display it.
Keep the working line close to parallel with the host rope. Pulling outward can disturb the gripping arrangement. Modern slippery materials may not hold even when the turns look correct, so compatibility has to be checked with the real ropes.
When to use it
Transfer tension from a line to another rope.
Keep in mind
Keep the pull parallel to the main rope. Slippery rope materials may not grip.
Check your knot
The gripping turns are on the intended load side.
The final half hitch follows the demonstrated route.
The working line pulls along the host, not away from it.
How to tie Rolling Hitch
Start beside the main rope
The smaller rope approaches from below on the right. The main rope stays straight.
Bring the end across
Curve the end toward the main rope and across its front.
Make the first turn
Wrap around the main rope and return to the front.
Tuck the second turn
Cross over the first turn and wrap again, tucking the new turn beside it.
Cross upward
Bring the end diagonally up and left across the front of the turns.
Finish with a half hitch
Go around the main rope in the same direction and tuck beneath the diagonal.
Bring out the tail
The short tail exits left, above the initial pair of turns.
Check the rolling hitch
Two tucked turns lie on the pull side. The working standing part pulls along the main rope, not away from it.