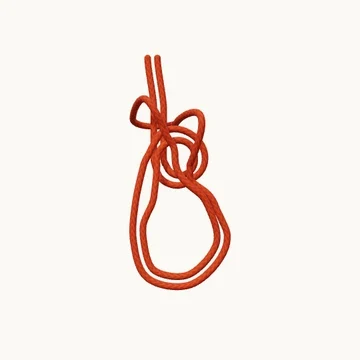
Bowline on a Bight

Bowline on a Bight
Preparing the rope…

Start with a doubled length

1/10

Fold the rope and keep both free standing parts together.

Loops & Ropework · 10 steps

Form two fixed eyes in doubled rope without threading a free end.

Also known as Double-loop bowline on a bight.

The bowline on a bight is tied with a closed fold. After making the opening in doubled rope, push the fold through it and enlarge the emerging loop. That loop then goes around the entire pair of large eyes and comes up behind them to collar the standing parts.

The large movement is the key to this knot. Merely putting the fold through the small opening leaves an unfinished arrangement. Rotate the model during the last stages to follow the fold below, behind and around the two eyes without losing track of its identity.

When to use it

  • Make a pair of eyes in a doubled section of rope.
  • Practice carrying a closed bight around existing loops.

Keep in mind

The two eyes do not automatically share a load equally. This lesson explains the knot, not a complete support or rescue system.

Check your knot

  • Both large eyes pass inside the enlarged bight.
  • The final collar surrounds both standing parts.
  • The paired strands lie together without an accidental twist.
How to tie Bowline on a Bight
  1. Start with a doubled length

    Fold the rope and keep both free standing parts together.

  2. Form the small opening

    Make a loop in the doubled rope.

  3. Make the two large eyes

    Carry the folded end around to leave two matching loops below.

  4. Pass the fold through

    Push the closed fold up through the small opening.

  5. Open the emerging fold

    Enlarge the fold in front of the two large loops.

  6. Take it around the loops

    Bring the enlarged bight down outside both large loops.

  7. Pass below their ends

    Keep the entire doubled loop inside the opened bight.

  8. Carry it behind

    Move the opened bight behind both loops without crossing through either rope.

  9. Draw it up around the standing parts

    Pull the bight upward to form a collar around the paired standing parts and dress the two eyes.

  10. Dress both eyes

    Take slack out of the nipping turns and standing-part collar. Keep the two large eyes open and aligned.

Explore the 3D steps
References & further reading