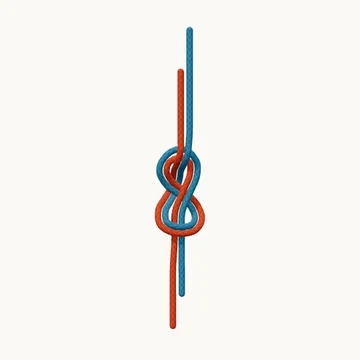
Figure Eight Bend

Figure Eight Bend
Preparing the rope…

Start the first rope

1/11

Leave enough end to tie a loose figure eight.

Loops & Ropework · 11 steps

Join two ropes by retracing a loose figure eight from the opposite direction.

Also known as Flemish bend, Figure 8 bend.

The figure-eight bend starts with a loose figure-eight stopper in one rope. The second end enters beside the first tail and follows the entire path backward. Once complete, every part of the knot has a matching neighboring strand, with the standing ropes leaving at opposite ends.

This is a rethreaded bend, not an offset figure eight tied with both ends pointing the same way. Keep the first knot open until the second rope has followed both lobes and the central crossing. Dressing should preserve those paired paths.

When to use it

  • Join compatible ropes with an easily traced rethreaded bend.
  • Practice following a knot backward before learning a figure-eight tie-in.

Keep in mind

This lesson explains the rethreaded structure. Critical rope systems require material-specific guidance, suitable tails and practical instruction.

Check your knot

  • The standing parts leave opposite ends.
  • Both lobes and the central crossing contain paired strands.
  • The second rope never skips a turn.
How to tie Figure Eight Bend
  1. Start the first rope

    Leave enough end to tie a loose figure eight.

  2. Make the upper turn

    Turn the first end around to make the upper opening.

  3. Cross the standing part

    Take the end behind its standing part.

  4. Make the lower turn

    Bring the end around the front and back toward the first opening.

  5. Thread the first eight

    Pass through the opening to finish the first figure eight.

  6. Bring in the other rope

    Approach the first tail from the opposite direction.

  7. Retrace the opening

    Follow the first tail backward through the same opening.

  8. Follow the lower turn

    Keep the second rope beside the first around the lower turn.

  9. Follow the upper turn

    Continue beside the first rope, including its crossing.

  10. Leave both tails

    The long standing parts exit at opposite ends. Leave a tail beside each one.

  11. Dress the paired turns

    Draw the standing parts apart and gather the two lobes. Keep both tails visible and every pair alongside its matching strand.

Explore the 3D steps
References & further reading